Home » laptrinhAndroid
Android mediaplayer tutorial
08:01 |
Android provides many ways to control playback of audio/video files and streams. One of this way is through a class called MediaPlayer.
Android is providing MediaPlayer class to access built-in mediaplayer services like playing audio,video e.t.c. In order to use MediaPlayer , we have to call a static Method create() of this class. This method returns an instance of MediaPlayer class. Its syntax is as follows:
Once you have created the Mediaplayer object you can call some methods to start or stop the music. These methods are listed below.
In order to start music from the beginning , you have to call reset() method. Its syntax is given below.
To experiment with this example , you need to run this on an actual device to hear the audio sound.
Following is the content of the modifed main activity file src/com.example.mediaplayer/MainActivity.java.
 icon from the toolbar. Before starting your application, Eclipse will
display following window to select an option where you want to run your
Android application.
icon from the toolbar. Before starting your application, Eclipse will
display following window to select an option where you want to run your
Android application.
 Select your mobile device as an option and then check your mobile device which will display your default screen:
 By default you would see the pause button disabled. Now press play
button and it would become disable and pause button become enable. It is
shown in the picture below:
By default you would see the pause button disabled. Now press play
button and it would become disable and pause button become enable. It is
shown in the picture below:
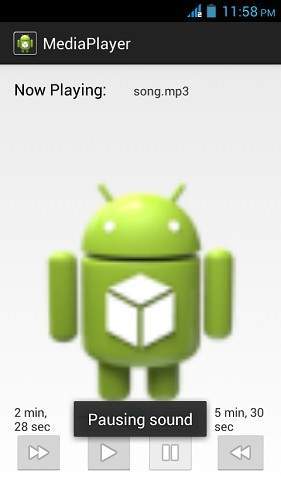
 Uptill now , the music has been playing. Now press the pause button and see the pause notification. This is shown below:
 Now when you press the play button again, the song will not play from
the begining but from where it was paused. Now press the fast forwad or
backward button to jump the song forward or backward 5 seconds. A time
came when the song cannot be jump forward. At this point , the
notification would appear which would be something like this:
Now when you press the play button again, the song will not play from
the begining but from where it was paused. Now press the fast forwad or
backward button to jump the song forward or backward 5 seconds. A time
came when the song cannot be jump forward. At this point , the
notification would appear which would be something like this:
 Your music would remain playing in the background while you are doing
other tasks in your mobile. In order to stop it , you have to exit this
application from background activities.
Your music would remain playing in the background while you are doing
other tasks in your mobile. In order to stop it , you have to exit this
application from background activities.
Android is providing MediaPlayer class to access built-in mediaplayer services like playing audio,video e.t.c. In order to use MediaPlayer , we have to call a static Method create() of this class. This method returns an instance of MediaPlayer class. Its syntax is as follows:
MediaPlayer mediaPlayer = MediaPlayer.create(this, R.raw.song);The second parameter is the name of the song that you want to play. You have to make a new folder under your project with name raw and place the music file into it.
Once you have created the Mediaplayer object you can call some methods to start or stop the music. These methods are listed below.
mediaPlayer.start();
mediaPlayer.pause();
On call to start() method, the music will start playing from the begininning. If this method is called again after the pause() method , the music would start playing from where it is left and not from the beginning.
In order to start music from the beginning , you have to call reset() method. Its syntax is given below.
mediaPlayer.reset();Apart from the start and pause method , there are other methods provided by this class for better dealing with audio/video files. These methods are listed below:
| Sr.No | Method & description |
|---|---|
| 1 | isPlaying() This method just returns true/false indicating the song is playing or not |
| 2 | seekTo(positon) This method takes an integer, and move song to that particular second |
| 3 | getCurrentDuration() This method returns the current position of song in milliseconds |
| 4 | getDuration() This method returns the total time duration of song in milliseconds |
| 5 | reset() This method resets the media player |
| 6 | release() This method releases any resource attached with MediaPlayer object |
| 7 | setVolume(float leftVolume, float rightVolume) This method sets the up down volume for this player |
| 8 | setDataSource(FileDescriptor fd) This method sets the data source of audio/video file |
| 9 | selectTrack(int index) This method takes an integer, and select the track from the list on that particular index |
| 10 | getTrackInfo() This method returns an array of track information |
Example
Here is an example demonstrating the use of MediaPlayer class. It creates a basic media player that allows you to forwad , backward , play and pause a song.To experiment with this example , you need to run this on an actual device to hear the audio sound.
| Steps | Description |
|---|---|
| 1 | You will use Eclipse IDE to create an Android application and name it as MediaPlayer under a package com.example.mediaplayer. While creating this project, make sure you Target SDK and Compile With at the latest version of Android SDK to use higher levels of APIs. |
| 2 | Modify src/MainActivity.java file to add MediaPlayer code. |
| 3 | Modify the res/layout/activity_main to add respective XML components |
| 4 | Modify the res/values/string.xml to add necessary string components |
| 5 | Create a new folder under MediaPlayer with name as raw and place an mp3 music file in it with name as song.mp3 |
| 6 | Run the application and choose a running android device and install the application on it and verify the results |
package com.example.mediaplayer;

import java.util.concurrent.TimeUnit;

import android.media.MediaPlayer;
import android.os.Bundle;
import android.os.Handler;
import android.app.Activity;
import android.view.Menu;
import android.view.View;
import android.widget.Button;
import android.widget.EditText;
import android.widget.ImageButton;
import android.widget.SeekBar;
import android.widget.TextView;
import android.widget.Toast;

public class MainActivity extends Activity {

   public TextView songName,startTimeField,endTimeField;
   private MediaPlayer mediaPlayer;
   private double startTime = 0;
   private double finalTime = 0;
   private Handler myHandler = new Handler();;
   private int forwardTime = 5000;
   private int backwardTime = 5000;
   private SeekBar seekbar;
   private ImageButton playButton,pauseButton;
   public static int oneTimeOnly = 0;
   @Override
   protected void onCreate(Bundle savedInstanceState) {
      super.onCreate(savedInstanceState);
      setContentView(R.layout.activity_main);
      songName = (TextView)findViewById(R.id.textView4);
      startTimeField =(TextView)findViewById(R.id.textView1);
      endTimeField =(TextView)findViewById(R.id.textView2);
      seekbar = (SeekBar)findViewById(R.id.seekBar1);
      playButton = (ImageButton)findViewById(R.id.imageButton1);
      pauseButton = (ImageButton)findViewById(R.id.imageButton2);
      songName.setText("song.mp3");
      mediaPlayer = MediaPlayer.create(this, R.raw.song);
      seekbar.setClickable(false);
      pauseButton.setEnabled(false);

   }

   public void play(View view){
   Toast.makeText(getApplicationContext(), "Playing sound",
   Toast.LENGTH_SHORT).show();
      mediaPlayer.start();
      finalTime = mediaPlayer.getDuration();
      startTime = mediaPlayer.getCurrentPosition();
      if(oneTimeOnly == 0){
         seekbar.setMax((int) finalTime);
         oneTimeOnly = 1;
      }

      endTimeField.setText(String.format("%d min, %d sec",
         TimeUnit.MILLISECONDS.toMinutes((long) finalTime),
         TimeUnit.MILLISECONDS.toSeconds((long) finalTime) -
         TimeUnit.MINUTES.toSeconds(TimeUnit.MILLISECONDS.
         toMinutes((long) finalTime)))
      );
      startTimeField.setText(String.format("%d min, %d sec",
         TimeUnit.MILLISECONDS.toMinutes((long) startTime),
         TimeUnit.MILLISECONDS.toSeconds((long) startTime) -
         TimeUnit.MINUTES.toSeconds(TimeUnit.MILLISECONDS.
         toMinutes((long) startTime)))
      );
      seekbar.setProgress((int)startTime);
      myHandler.postDelayed(UpdateSongTime,100);
      pauseButton.setEnabled(true);
      playButton.setEnabled(false);
   }

   private Runnable UpdateSongTime = new Runnable() {
      public void run() {
         startTime = mediaPlayer.getCurrentPosition();
         startTimeField.setText(String.format("%d min, %d sec",
            TimeUnit.MILLISECONDS.toMinutes((long) startTime),
            TimeUnit.MILLISECONDS.toSeconds((long) startTime) -
            TimeUnit.MINUTES.toSeconds(TimeUnit.MILLISECONDS.
            toMinutes((long) startTime)))
         );
         seekbar.setProgress((int)startTime);
         myHandler.postDelayed(this, 100);
      }
   };
   public void pause(View view){
      Toast.makeText(getApplicationContext(), "Pausing sound",
      Toast.LENGTH_SHORT).show();

      mediaPlayer.pause();
      pauseButton.setEnabled(false);
      playButton.setEnabled(true);
   }
   public void forward(View view){
      int temp = (int)startTime;
      if((temp+forwardTime)<=finalTime){
         startTime = startTime + forwardTime;
         mediaPlayer.seekTo((int) startTime);
      }
      else{
         Toast.makeText(getApplicationContext(),
         "Cannot jump forward 5 seconds",
         Toast.LENGTH_SHORT).show();
      }

   }
   public void rewind(View view){
      int temp = (int)startTime;
      if((temp-backwardTime)>0){
         startTime = startTime - backwardTime;
         mediaPlayer.seekTo((int) startTime);
      }
      else{
         Toast.makeText(getApplicationContext(),
         "Cannot jump backward 5 seconds",
         Toast.LENGTH_SHORT).show();
      }

   }

   @Override
   public boolean onCreateOptionsMenu(Menu menu) {
   // Inflate the menu; this adds items to the action bar if it is present.
   getMenuInflater().inflate(R.menu.main, menu);
   return true;
   }

 }
Following is the modified content of the xml res/layout/activity_main.xml.
<RelativeLayout xmlns:android="http://schemas.android.com/apk/res/android"
   xmlns:tools="http://schemas.android.com/tools"
   android:layout_width="match_parent"
   android:layout_height="match_parent"
   android:paddingBottom="@dimen/activity_vertical_margin"
   android:paddingLeft="@dimen/activity_horizontal_margin"
   android:paddingRight="@dimen/activity_horizontal_margin"
   android:paddingTop="@dimen/activity_vertical_margin"
   tools:context=".MainActivity" >

   <ImageButton
      android:id="@+id/imageButton3"
      android:layout_width="wrap_content"
      android:layout_height="wrap_content"
      android:layout_alignParentBottom="true"
      android:layout_alignParentLeft="true"
      android:layout_marginBottom="14dp"
      android:onClick="forward"
      android:src="@android:drawable/ic_media_ff" />

   <ImageButton
      android:id="@+id/imageButton4"
      android:layout_width="wrap_content"
      android:layout_height="wrap_content"
      android:layout_alignParentRight="true"
      android:layout_alignTop="@+id/imageButton2"
      android:layout_marginLeft="22dp"
      android:layout_toRightOf="@+id/imageButton2"
      android:onClick="rewind"
      android:src="@android:drawable/ic_media_rew" />

   <ImageButton
      android:id="@+id/imageButton2"
      android:layout_width="wrap_content"
      android:layout_height="wrap_content"
      android:layout_alignTop="@+id/imageButton1"
      android:layout_marginLeft="14dp"
      android:layout_toRightOf="@+id/imageButton1"
      android:onClick="pause"
      android:src="@android:drawable/ic_media_pause" />

   <ImageButton
      android:id="@+id/imageButton1"
      android:layout_width="wrap_content"
      android:layout_height="wrap_content"
      android:layout_alignTop="@+id/imageButton3"
      android:layout_marginLeft="24dp"
      android:layout_toRightOf="@+id/imageButton3"
      android:onClick="play"
      android:src="@android:drawable/ic_media_play" />

   <SeekBar
      android:id="@+id/seekBar1"
      android:layout_width="match_parent"
      android:layout_height="wrap_content"
      android:layout_above="@+id/imageButton3"
      android:layout_toLeftOf="@+id/textView2"
      android:layout_toRightOf="@+id/textView1" />

   <TextView
      android:id="@+id/textView1"
      android:layout_width="wrap_content"
      android:layout_height="wrap_content"
      android:layout_alignRight="@+id/imageButton3"
      android:layout_alignTop="@+id/seekBar1"
      android:text="@string/inital_Time"
      android:textAppearance="?android:attr/textAppearanceSmall" />

   <TextView
      android:id="@+id/textView2"
      android:layout_width="wrap_content"
      android:layout_height="wrap_content"
      android:layout_alignLeft="@+id/imageButton4"
      android:layout_alignTop="@+id/seekBar1"
      android:text="@string/inital_Time"
      android:textAppearance="?android:attr/textAppearanceSmall" />

   <TextView
      android:id="@+id/textView3"
      android:layout_width="wrap_content"
      android:layout_height="wrap_content"
      android:layout_alignLeft="@+id/imageButton3"
      android:text="@string/hello_world"
      android:textAppearance="?android:attr/textAppearanceMedium" />

   <ImageView
      android:id="@+id/imageView1"
      android:layout_width="match_parent"
      android:layout_height="match_parent"
      android:layout_alignParentBottom="true"
      android:layout_alignParentLeft="true"
      android:layout_below="@+id/textView3"
      android:src="@drawable/ic_launcher" />

   <TextView
      android:id="@+id/textView4"
      android:layout_width="wrap_content"
      android:layout_height="wrap_content"
      android:layout_alignBaseline="@+id/textView3"
      android:layout_alignBottom="@+id/textView3"
      android:layout_toRightOf="@+id/imageButton1"
      android:text="TextView" />

</RelativeLayout>
Following is the content of the res/values/string.xml.
<?xml version="1.0" encoding="utf-8"?>
<resources>

   <string name="app_name">MediaPlayer</string>
   <string name="action_settings">Settings</string>
   <string name="hello_world">Now Playing:</string>
   <string name="inital_Time">0 min, 0 sec</string>

</resources>
Following is the content of AndroidManifest.xml file.
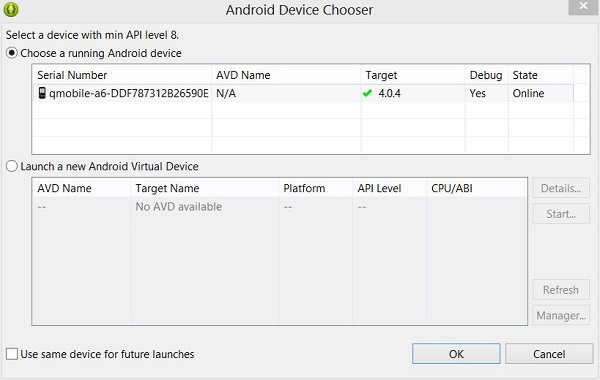
<?xml version="1.0" encoding="utf-8"?>
<manifest xmlns:android="http://schemas.android.com/apk/res/android"
   package="com.example.mediaplayer"
   android:versionCode="1"
   android:versionName="1.0" >

   <uses-sdk
      android:minSdkVersion="8"
      android:targetSdkVersion="17" />

   <application
      android:allowBackup="true"
      android:icon="@drawable/ic_launcher"
      android:label="@string/app_name"
      android:theme="@style/AppTheme" >
      <activity
         android:name="com.example.mediaplayer.MainActivity"
         android:label="@string/app_name" >
         <intent-filter>
            <action android:name="android.intent.action.MAIN" />

            <category android:name="android.intent.category.LAUNCHER" />
         </intent-filter>
      </activity>
   </application>
</manifest>
Let's try to run your MediaPlayer application. I assume you have connected your actual Android Mobile device with your computer. To run the app from Eclipse, open one of your project's activity files and click Run
icon from the toolbar. Before starting your application, Eclipse will
display following window to select an option where you want to run your
Android application.
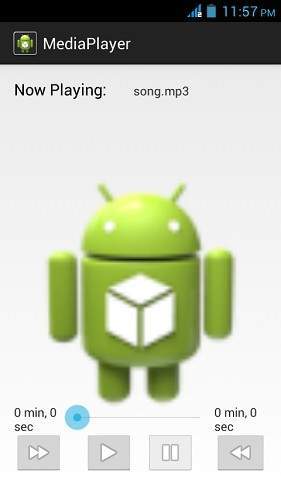
Select your mobile device as an option and then check your mobile device which will display your default screen:
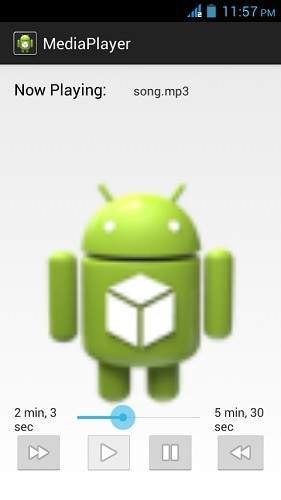
By default you would see the pause button disabled. Now press play
button and it would become disable and pause button become enable. It is
shown in the picture below:
Uptill now , the music has been playing. Now press the pause button and see the pause notification. This is shown below:
Now when you press the play button again, the song will not play from
the begining but from where it was paused. Now press the fast forwad or
backward button to jump the song forward or backward 5 seconds. A time
came when the song cannot be jump forward. At this point , the
notification would appear which would be something like this:
Your music would remain playing in the background while you are doing
other tasks in your mobile. In order to stop it , you have to exit this
application from background activities.Handling and Displaying Images in Android
09:07 |Android provides views which can be used to display images from various sources and provide transitions between them. Some of these views are the
ImageView and the ImageSwitcher.
These views provide a high level of functionality to display images in a
user interface so that we can concentrate on the images we want to
display rather than taking care of rendering.In this article we are going to see how we can use these views effectively in a user interface.
Using the image view to display images.
To render images Android provides us with theImageView class. Let’s start by creating a program that will use an ImageView to display some images and a button which when clicked will change the image in the ImageView. You can find the code for this section on GitHub.Create a basic Android project with an Activity that sets the main view from a layout file and does nothing else. Then open the layout file and add the
ImageView and a button as shown below:
1
2
3
4
5
6
7
8
9
10
11
12
13
14
15
16
17
18
19
| <?xml version="1.0" encoding="utf-8"?> android:layout_width="match_parent" android:layout_height="match_parent" android:paddingLeft="16dp" android:paddingRight="16dp" android:orientation="vertical"> <ImageView android:id="@+id/imageDisplay" android:layout_width="wrap_content" android:layout_height="wrap_content" /> <Button android:id="@+id/btnRotateImage" android:layout_width="wrap_content" android:layout_height="wrap_content" android:text="Next Image" /></LinearLayout> |
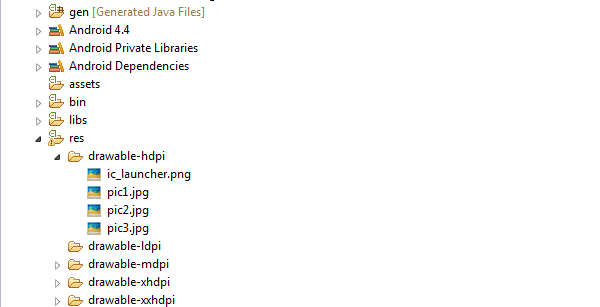
LinearLayout and added an ImageView to display an image and a button which will rotate the images in the imageView.Add some images to the resource folder depending on the screen sizes you are planning to support as shown below:
Now update your Activity code as follows, using appropriate names for your project:
1
2
3
4
5
6
7
8
9
10
11
12
13
14
15
16
17
18
19
20
21
22
23
24
25
26
27
28
29
30
31
32
33
34
35
36
37
38
39
| public class ImageChangingActivity extends Activity { private Integer images[] = {R.drawable.pic1, R.drawable.pic2, R.drawable.pic3}; private int currImage = 0; @Override protected void onCreate(Bundle savedInstanceState) { super.onCreate(savedInstanceState); setContentView(R.layout.activity_image_changing); setInitialImage(); setImageRotateListener(); } private void setImageRotateListener() { final Button rotatebutton = (Button) findViewById(R.id.btnRotateImage); rotatebutton.setOnClickListener(new OnClickListener() { @Override public void onClick(View arg0) { currImage++; if (currImage == 3) { currImage = 0; } setCurrentImage(); } }); } private void setInitialImage() { setCurrentImage(); } private void setCurrentImage() { final ImageView imageView = (ImageView) findViewById(R.id.imageDisplay); imageView.setImageResource(images[currImage]); }} |
OnCreate method we set the content view to the layout created. In the setImageRotateListener function we set up a listener to the onClick event of the button which changes the currentImage counter and sets the new image in the ImageView.The
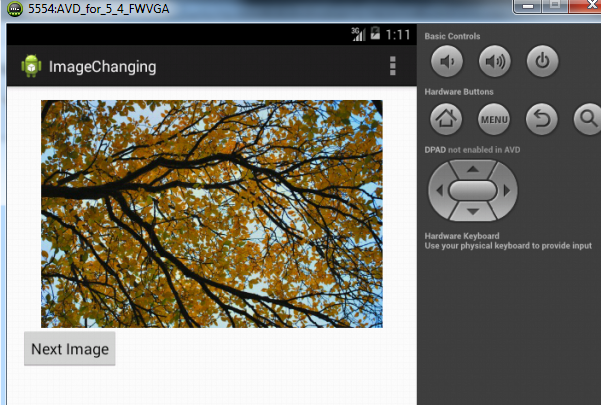
setCurrentImage function gets the ImageView object using the findViewById function, then sets the resource id of the current image using the setImageResource function on the ImageView which will display the image in the image view.If you run the program you should see the image in the image view and clicking it should change the image to the next one:
Using the Image Switcher View in Android.
In the above example we switched the image in the image view. This switching of images does not happen in a very smooth way and you might want to use a transition when the image changes. For this we use theImageSwitcher View.Find the code for this example on GitHub.
First add an image switcher view to the layout as follows:
1
2
3
4
5
6
7
8
9
10
11
12
13
14
15
16
17
18
19
20
| <?xml version="1.0" encoding="utf-8"?> android:layout_width="match_parent" android:layout_height="match_parent" android:paddingLeft="16dp" android:paddingRight="16dp" android:orientation="vertical"> <ImageSwitcher android:id="@+id/imageSwitcher" android:layout_width="wrap_content" android:layout_height="wrap_content" /> <Button android:id="@+id/btnRotateImage" android:layout_width="wrap_content" android:layout_height="wrap_content" android:text="Next Image" /></LinearLayout> |
ImageSwitcher and setup the button to change the image with a transition.
1
2
3
4
5
6
7
8
9
10
11
12
13
14
15
16
17
18
19
20
21
22
23
24
25
26
27
28
29
30
31
32
33
34
35
36
37
38
39
40
41
42
43
44
45
46
47
48
49
50
51
52
| public class ImageSwitcherExampleActivity extends Activity { private Integer images[] = {R.drawable.pic1, R.drawable.pic2, R.drawable.pic3}; private int currImage = 0; @Override protected void onCreate(Bundle savedInstanceState) { super.onCreate(savedInstanceState); setContentView(R.layout.activity_image_switcher_example); initializeImageSwitcher(); setInitialImage(); setImageRotateListener(); } private void initializeImageSwitcher() { final ImageSwitcher imageSwitcher = (ImageSwitcher) findViewById(R.id.imageSwitcher); imageSwitcher.setFactory(new ViewFactory() { @Override public View makeView() { ImageView imageView = new ImageView(ImageSwitcherExampleActivity.this); return imageView; } }); imageSwitcher.setInAnimation(AnimationUtils.loadAnimation(this, android.R.anim.slide_in_left)); imageSwitcher.setOutAnimation(AnimationUtils.loadAnimation(this, android.R.anim.slide_out_right)); } private void setImageRotateListener() { final Button rotatebutton = (Button) findViewById(R.id.btnRotateImage); rotatebutton.setOnClickListener(new OnClickListener() { @Override public void onClick(View arg0) { currImage++; if (currImage == 3) { currImage = 0; } setCurrentImage(); } }); } private void setInitialImage() { setCurrentImage(); } private void setCurrentImage() { final ImageSwitcher imageSwitcher = (ImageSwitcher) findViewById(R.id.imageSwitcher); imageSwitcher.setImageResource(images[currImage]); }} |
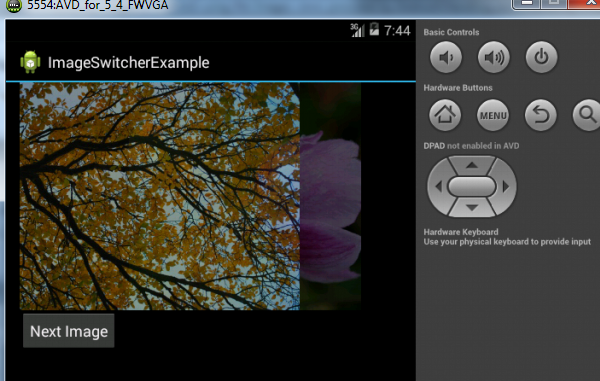
ImageSwitcher object and then set the ViewFactory which creates a plain ImageView. Then we set the animation to fade in and fade out. We update the setCurrentImage function to set the images in the ImageSwitcher.Now the image will change with an animation.
Downloading and setting images on ImageView from Internet.
The code for this section can be found on GitHub.You might not always have images available to you locally and may instead want to display them from the internet.
You should not undertake any network operations in the UI thread, instead the download should happen in a different background thread. We will do this in an
Async Task. First set the permission to use the Internet in our AndroidManifest.xml as follows:
1
| <uses-permission android:name="android.permission.INTERNET" /> |
ImageView and a Button as shown:
1
2
3
4
5
6
7
8
9
10
11
12
13
14
15
16
17
18
19
| <?xml version="1.0" encoding="utf-8"?> android:layout_width="match_parent" android:layout_height="match_parent" android:paddingLeft="16dp" android:paddingRight="16dp" android:orientation="vertical"> <ImageView android:id="@+id/imageDisplay" android:layout_width="wrap_content" android:layout_height="wrap_content" /> <Button android:id="@+id/btnRotateImage" android:layout_width="wrap_content" android:layout_height="wrap_content" android:text="Next Image" /></LinearLayout> |
AsyncTask which takes the ImageView and URL to download, downloads the image and sets the image in the ImageView.The
ImageDownloader async task downloads the image data and sets the ImageView. The complete activity code should now be as follows:
1
2
3
4
5
6
7
8
9
10
11
12
13
14
15
16
17
18
19
20
21
22
23
24
25
26
27
28
29
30
31
32
33
34
35
36
37
38
39
40
41
42
43
44
45
46
47
48
49
50
51
52
53
54
55
56
57
58
59
60
61
62
63
64
65
66
| public class ImagedownloaderActivity extends Activity { }; private class ImageDownloader extends AsyncTask<String, Void, Bitmap> { ImageView bmImage; public ImageDownloader(ImageView bmImage) { this.bmImage = bmImage; } protected Bitmap doInBackground(String... urls) { String url = urls[0]; Bitmap bitmap = null; try { InputStream in = new java.net.URL(url).openStream(); bitmap = BitmapFactory.decodeStream(in); } catch (Exception e) { Log.e("MyApp", e.getMessage()); } return bitmap; } protected void onPostExecute(Bitmap result) { bmImage.setImageBitmap(result); } } private int currImage = 0; @Override protected void onCreate(Bundle savedInstanceState) { super.onCreate(savedInstanceState); setContentView(R.layout.activity_imagedownloader); setInitialImage(); setImageRotateListener(); } private void setImageRotateListener() { final Button rotatebutton = (Button) findViewById(R.id.btnRotateImage); rotatebutton.setOnClickListener(new OnClickListener() { @Override public void onClick(View arg0) { currImage++; if (currImage == 3) { currImage = 0; } setCurrentImage(); } }); } private void setInitialImage() { setCurrentImage(); } private void setCurrentImage() { final ImageView imageView = (ImageView) findViewById(R.id.imageDisplay); ImageDownloader imageDownLoader = new ImageDownloader(imageView); imageDownLoader.execute(imageUrls[currImage]); }} |
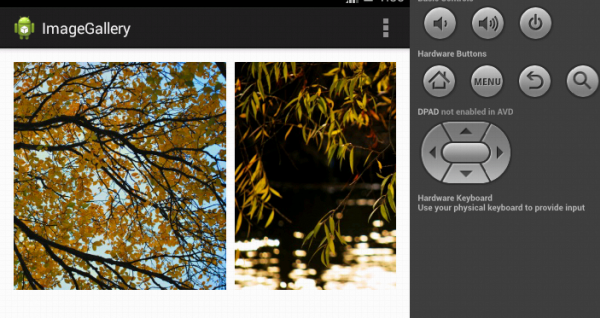
imageUrls array. In the setCurrentImage function we pass the ImageView to the ImageDownloader Async task and pass the URL of the image to download and set in the ImageView. The ImageDownloader Async task will download the image and set it in the ImageView.Implementing a Gallery using the Horizontal Scroll view.
The code for this example can be found on GitHub.In the above examples we saw how to display one image at a time using an
ImageView.
Sometimes we might want to display a variable number of images and let
the user scroll through them. This we can achieve by putting a LinearLayout inside a horizontal scrollView and then dynamically add ImageViews to that linear layout. For this we create a new activity called ImageGalleryActivityand update the layout file accordingly:
1
2
3
4
5
6
7
8
9
10
11
12
13
14
15
16
17
18
19
20
21
| android:layout_width="match_parent" android:layout_height="match_parent" android:paddingBottom="@dimen/activity_vertical_margin" android:paddingLeft="@dimen/activity_horizontal_margin" android:paddingRight="@dimen/activity_horizontal_margin" android:paddingTop="@dimen/activity_vertical_margin" tools:context="com.example.imagegallery.ImageGalleryActivity"> <HorizontalScrollView android:layout_width="match_parent" android:layout_height="wrap_content"> <LinearLayout android:id="@+id/imageGallery" android:layout_width="wrap_content" android:layout_height="wrap_content" android:orientation="horizontal" /> </HorizontalScrollView></RelativeLayout> |
1
2
3
4
5
6
7
8
9
10
11
12
13
14
15
16
17
18
19
20
21
22
23
24
25
26
27
28
| public class ImageGalleryActivity extends Activity { private Integer images[] = {R.drawable.pic1, R.drawable.pic2, R.drawable.pic3}; @Override protected void onCreate(Bundle savedInstanceState) { super.onCreate(savedInstanceState); setContentView(R.layout.activity_image_gallery); addImagesToThegallery(); } private void addImagesToThegallery() { LinearLayout imageGallery = (LinearLayout) findViewById(R.id.imageGallery); for (Integer image : images) { imageGallery.addView(getImageView(image)); } } private View getImageView(Integer image) { ImageView imageView = new ImageView(getApplicationContext()); LinearLayout.LayoutParams lp = new LinearLayout.LayoutParams(LinearLayout.LayoutParams.WRAP_CONTENT, LinearLayout.LayoutParams.WRAP_CONTENT); lp.setMargins(0, 0, 10, 0); imageView.setLayoutParams(lp); imageView.setImageResource(image); return imageView; }} |
ImageViews and add margins to them. The LinerLayout
has the orientation set to horizontal. Now if we run the program, we
will be able to see the images in a Horizontally scrollable gallery as
seen below.